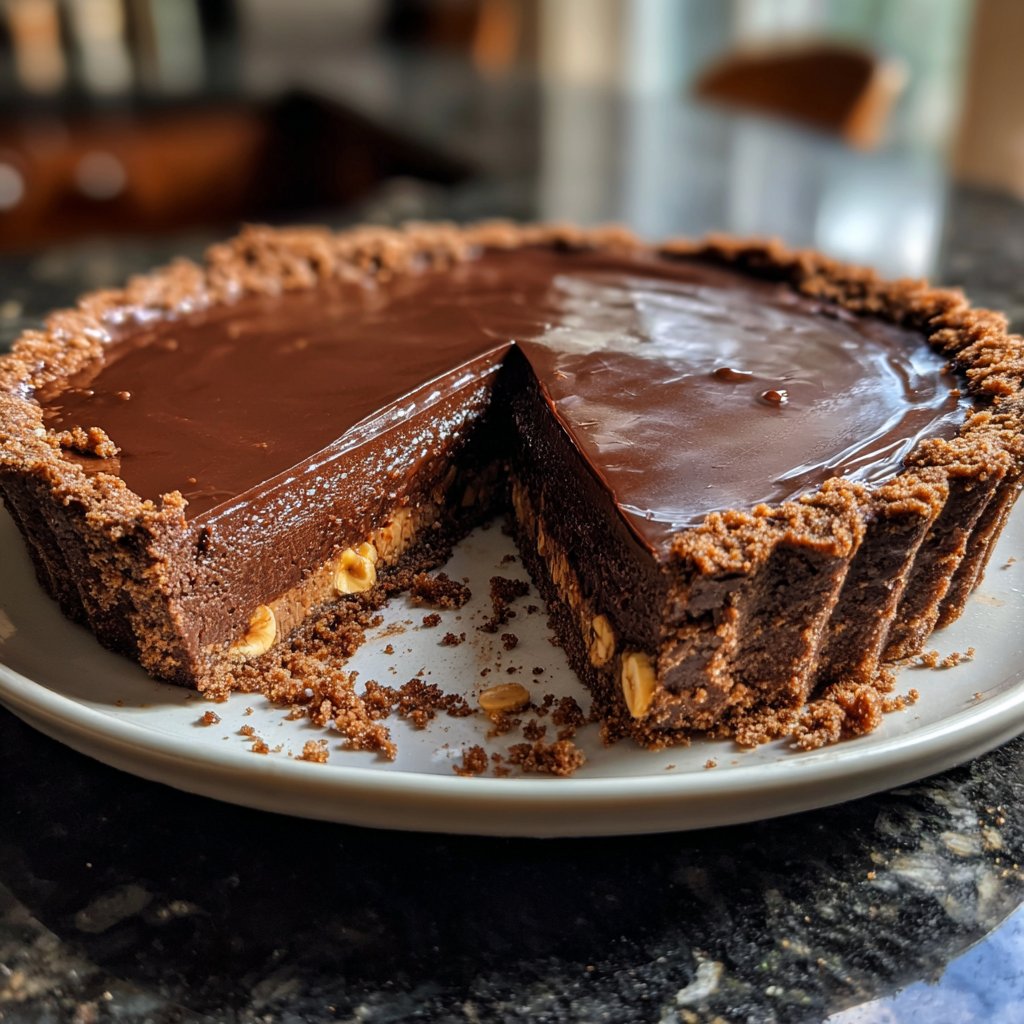
Chocolate Hazelnut Tart
Highlighted under: Oven-Crafted Sweets
I absolutely love making this Chocolate Hazelnut Tart whenever I want to treat myself or surprise guests. The combination of rich chocolate with the nutty flavor of hazelnuts creates an exquisite dessert that feels decadent yet achievable. With a buttery crust and a silky filling, this tart is perfect for any occasion. Plus, it's surprisingly simple to prepare, and once you take that first bite, you’ll understand why it’s become a staple in my kitchen. Trust me, this tart will quickly become your go-to dessert!
When I first attempted this Chocolate Hazelnut Tart, I was surprised at how well the flavors melded together. The combo of rich chocolate and toasted hazelnuts seemed almost magical. I ensured to toast the hazelnuts beforehand, which really brought out their nutty essence and enhanced the overall taste of the tart. This small step elevated the dish from good to simply unforgettable.
I've learned that letting the tart cool completely before slicing is crucial; it helps the filling set perfectly, giving you those clean slices that look as good as they taste. The first time I rushed it, I ended up with a messy yet delicious slice, but now I always wait. Patience truly pays off with this tart!

Why You'll Love This Recipe
- Rich chocolate flavor paired with toasted hazelnuts
- Creamy texture that melts in your mouth
- Elegant presentation perfect for celebrations
Understanding the Ingredients
The essence of this Chocolate Hazelnut Tart lies in the quality of its ingredients. Use a high-quality chocolate hazelnut spread, as it directly influences the filling's flavor. Look for spreads that use whole hazelnuts instead of additives, as this will give your tart a more authentic and rich taste. Additionally, opting for fresh, high-fat heavy cream will enhance the tart's luscious texture, creating that melt-in-your-mouth experience you're aiming for.
When it comes to the crust, using unsweetened cocoa powder not only provides the deep chocolate flavor but also balances the sweetness of the filling. Ensure your unsalted butter is softened to room temperature for easy mixing, which will help create a smooth dough. If you’re short on time, you can easily substitute store-bought pie crust, but do remember that the texture and flavor will differ slightly.
Key Techniques for Success
Blind baking the tart crust is a crucial step in this recipe. By pre-baking the crust for 15 minutes at 350°F (175°C), you prevent it from becoming soggy after the filling is added. To check if it’s ready, look for a firm texture and slightly dry edges, ensuring it maintains its shape. For added security, place pie weights or dried beans on parchment paper over the crust during this phase; this will also help prevent air bubbles from forming.
When incorporating the eggs into the filling, ensure that the mixture is thoroughly combined to avoid any separation during baking. Whisk until all ingredients are smooth and glossy. You may also choose to temper the eggs by gradually adding a bit of the filling mixture to the eggs before combining all the ingredients. This helps avoid scrambling the eggs when added directly to the warm mixture.
Ingredients
Gather the following ingredients to get started:
For the tart crust:
- 1 ½ cups all-purpose flour
- ½ cup unsweetened cocoa powder
- ½ cup powdered sugar
- ½ teaspoon salt
- 1 stick (½ cup) unsalted butter, softened
- 1 large egg yolk
For the filling:
- 1 cup chocolate hazelnut spread
- 3 large eggs
- ½ cup heavy cream
- ¼ cup finely chopped toasted hazelnuts
- 1 teaspoon vanilla extract
- Pinch of salt
Make sure to have all your ingredients measured and ready before you begin!
Instructions
Follow these steps to create your Chocolate Hazelnut Tart:
Prepare the tart crust
In a mixing bowl, combine the flour, cocoa powder, powdered sugar, and salt. Add the softened butter and mix until crumbly. Incorporate the egg yolk and mix until a dough forms. Press the dough into a tart pan and refrigerate for 15 minutes.
Bake the crust
Preheat the oven to 350°F (175°C). Blind bake the crust for 15 minutes. Remove from the oven and allow it to cool.
Make the filling
In a bowl, whisk together the chocolate hazelnut spread, eggs, heavy cream, chopped hazelnuts, vanilla extract, and a pinch of salt until smooth.
Fill the crust
Pour the filling into the cooled tart crust. Spread it evenly and smooth the top with a spatula.
Bake the tart
Bake the tart in the preheated oven for 15 minutes. The filling should set yet remain slightly soft.
Cool and serve
Allow the tart to cool completely before slicing. Serve with whipped cream or toast hazelnuts for garnish.
Enjoy this delightful tart with family and friends!
Pro Tips
- For an extra flavor boost, consider adding a splash of espresso to the filling or a light dusting of cocoa powder before serving.
Serving Suggestions
To elevate the presentation of your Chocolate Hazelnut Tart, consider garnishing it with lightly whipped cream and a sprinkle of chopped toasted hazelnuts. This not only adds visual appeal but also enhances the flavor profile, offering a delightful contrast in texture. You can also drizzle some additional chocolate or a hazelnut syrup for an extra indulgent touch, perfect for special occasions.
If you're planning to serve this tart for a gathering, think about pairing it with a complementary beverage. A nice espresso or a glass of dessert wine, such as a port, can enhance the chocolate flavors beautifully. Alternatively, serving it alongside fresh berries can add a refreshing tartness to balance the rich sweetness.
Storage Tips
This tart can be made in advance, and it actually tastes even better after sitting for a day to allow the flavors to meld. Store it in the refrigerator, covered, for up to 3 days. If you need to prepare it further ahead, you can freeze the assembled tart before baking for up to 2 months. Just be sure to wrap it tightly in plastic wrap and foil to prevent freezer burn.
When you're ready to enjoy a frozen tart, allow it to thaw in the fridge overnight before baking. Then, bake it as per the original directions. Keep in mind that you may need to adjust the baking time slightly. Look for the filling to be just set but still a bit wobbly in the center for the perfect texture.
Questions About Recipes
→ Can I use store-bought pastry instead of making my own?
Yes, you can use premade pastry crust if you’re short on time; just follow the package instructions for baking.
→ How long will the tart last?
The tart can be stored in the refrigerator for up to 3 days, but it’s best enjoyed fresh.
→ Can I use other nuts?
Absolutely! Feel free to substitute hazelnuts with almonds or walnuts for a different flavor profile.
→ What can I do if the filling doesn't set?
If your filling is too runny, it may need additional baking time; bake in 5-minute increments until set.
Chocolate Hazelnut Tart
Created by: Riley Dawson
Recipe Type: Oven-Crafted Sweets
Skill Level: Intermediate
Final Quantity: 8 servings
What You'll Need
For the tart crust:
- 1 ½ cups all-purpose flour
- ½ cup unsweetened cocoa powder
- ½ cup powdered sugar
- ½ teaspoon salt
- 1 stick (½ cup) unsalted butter, softened
- 1 large egg yolk
For the filling:
- 1 cup chocolate hazelnut spread
- 3 large eggs
- ½ cup heavy cream
- ¼ cup finely chopped toasted hazelnuts
- 1 teaspoon vanilla extract
- Pinch of salt
How-To Steps
In a mixing bowl, combine the flour, cocoa powder, powdered sugar, and salt. Add the softened butter and mix until crumbly. Incorporate the egg yolk and mix until a dough forms. Press the dough into a tart pan and refrigerate for 15 minutes.
Preheat the oven to 350°F (175°C). Blind bake the crust for 15 minutes. Remove from the oven and allow it to cool.
In a bowl, whisk together the chocolate hazelnut spread, eggs, heavy cream, chopped hazelnuts, vanilla extract, and a pinch of salt until smooth.
Pour the filling into the cooled tart crust. Spread it evenly and smooth the top with a spatula.
Bake the tart in the preheated oven for 15 minutes. The filling should set yet remain slightly soft.
Allow the tart to cool completely before slicing. Serve with whipped cream or toast hazelnuts for garnish.
Extra Tips
- For an extra flavor boost, consider adding a splash of espresso to the filling or a light dusting of cocoa powder before serving.
Nutritional Breakdown (Per Serving)
- Calories: 380 kcal
- Total Fat: 26g
- Saturated Fat: 15g
- Cholesterol: 195mg
- Sodium: 85mg
- Total Carbohydrates: 32g
- Dietary Fiber: 3g
- Sugars: 24g
- Protein: 6g